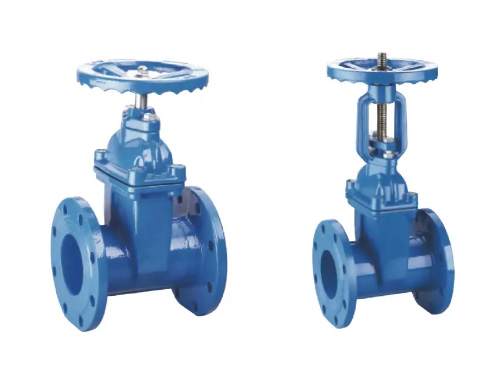
How to choose between concealed stem gate valve and
The core selection of concealed stem gate valves and exposed
2025-12-12 04:31:44

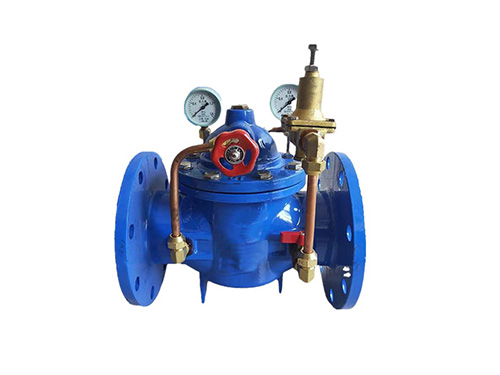
The debugging core of the 200X pressure reducing valve (pilot operated pressure reducing valve) after installation is to carefully set the outlet pressure, verify the pressure reducing stability, and investigate leaks and abnormalities. It is necessary to follow the four step process of "preparation work → pressure setting → stability testing → fault correction" to confirm that the valve is suitable for the system operating conditions. The specific steps are as follows:
Preparation work before debugging
Working condition verification: Confirm that the valve model (such as 200X-16Q), nominal pressure (PN), and nominal diameter (DN) are consistent with the system requirements, the inlet pressure does not exceed the rated pressure of the valve, and the outlet side is not blocked or closed (to avoid overpressure).
Pipeline inspection: Confirm that the valve installation direction is correct (the valve body arrow is consistent with the flow direction of the medium), the flange bolts are evenly tightened, the front and rear straight pipe sections meet the requirements (inlet ≥ 10 times DN, outlet ≥ 5 times DN), and the inlet side filter has been installed and cleaned (filtration accuracy ≤ 2mm).
Tool preparation: Prepare a pressure gauge (accuracy ≥ 0.4 level, range 1.5~2 times the set pressure), adjustable wrench, screwdriver, and logbook. If there is an Anran valve on the outlet side, the set pressure should be verified in advance.
System preprocessing: Slowly open the inlet gate valve to exhaust the air in the pipeline (open the outlet side exhaust valve or end water service), to avoid air blockage affecting debugging; Check for any leakage in the valve and close the outlet valve after confirming that there are no abnormalities.
Core debugging steps (outlet pressure setting and calibration)
1. Initial pressure observation
Keep the outlet valve closed and record the reading on the inlet pressure gauge (P1). At this point, the outlet pressure should be close to the inlet pressure (the valve is not depressurized).
Confirm that the valve pilot valve (top adjustment knob) is in the released state (initial no preload) to avoid excessive initial pressure.
2. Set export target pressure
Slowly rotate the pilot valve adjustment knob clockwise (1/4 turn each time), while observing the pressure gauge at the outlet end (it is recommended to install a pressure gauge near the outlet), until the pressure meets the system design requirements (such as the municipal water supply setting of 0.3MPa and the high-rise building partition water supply setting of 0.4-0.6MPa).
During the adjustment process, pause for 3-5 seconds to allow the pressure to stabilize before continuing to adjust, in order to avoid setting deviations caused by pressure fluctuations.
If the pressure exceeds the target value, turn the adjustment knob counterclockwise to release the pressure and re adjust to the fine pressure.
3. Dynamic stability testing
Flow impact test: Slowly open the outlet valve (or open the end water equipment), simulate the actual working conditions, observe the changes in outlet pressure, and allow the fluctuation range to be ≤± 0.02MPa (if 0.3MPa is set, the fluctuation should be between 0.28-0.32MPa).
Pressure maintenance test: Keep the outlet flow stable (such as opening 30%, 50%, 90% flow), observe continuously for 10-15 minutes, and if there is no significant decrease or surge in pressure, it is considered qualified.
Import pressure fluctuation adaptation test: If there is a fluctuation in the system's import pressure (such as changes in municipal pipeline pressure), observe whether the outlet pressure can remain stable and verify the valve's pressure reduction compensation ability.
4. Anran valve linkage test (if installed together)
If an Anran valve is installed on the outlet side, it is necessary to confirm that the set pressure of the Anran valve is 1.1-1.2 times higher than the set outlet pressure (such as setting the outlet at 0.3MPa and the safety valve at 0.33-0.36MPa).
It can be verified whether the Anran valve can release pressure normally when overpressure occurs by briefly closing the outlet valve and slightly increasing the set pressure of the pressure reducing valve. After testing, the pressure of the pressure reducing valve can be reset.
Debugging qualification standards
Detailed export pressure: static pressure deviation from set value ≤ ± 0.01MPa, dynamic pressure fluctuation ≤ ± 0.02MPa;
No leakage: There is no medium leakage at the valve body flange, valve stem, and pilot valve interface;
Smooth operation: The valve has no obvious noise (≤ 65dB) or vibration, and the valve core moves flexibly without jamming;
Excellent pressure reduction effect: The outlet pressure is stable within the allowable range of the system and lower than the inlet pressure (the pressure reduction ratio meets the design requirements, usually the inlet pressure is ≥ 1.2 times the outlet pressure).
Precautions
During the debugging process, avoid rotating the adjustment knob at a suitable speed to prevent downstream equipment damage caused by sudden pressure increases;
If the system medium is hot water or steam, the pipeline needs to be preheated before debugging to avoid deformation of valve seals caused by excessive temperature differences;
After debugging is completed, mark the set pressure value on the valve body or pipeline for future maintenance reference;
Firstly, after debugging, it is recommended to run for 24 hours and recheck the pressure stability to confirm that there are no potential faults.
BLOGS
Copyright © 2025-2026 http://www.xinhuifluid.com All Rights Reserved Hebei Xinhui Fluid Technology Co., Ltd.
Add:Wangtun Village, Siying Township, Botou City, Cangzhou City, Hebei Province
Url:http://www.xinhuifluid.com
Tel:+86-18230173208
Email:liu18230173208@gmail.com

